Traditional Homemade Apple Pie
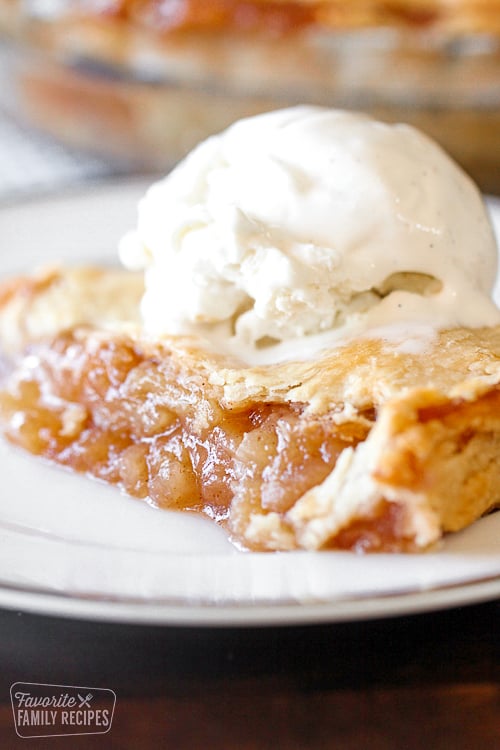
Traditional Homemade Apple Pie is as warm and cozy as the season. With plump juicy apples, light flaky crust and a hint of cinnamon, this pie is everything you love about the holidays.
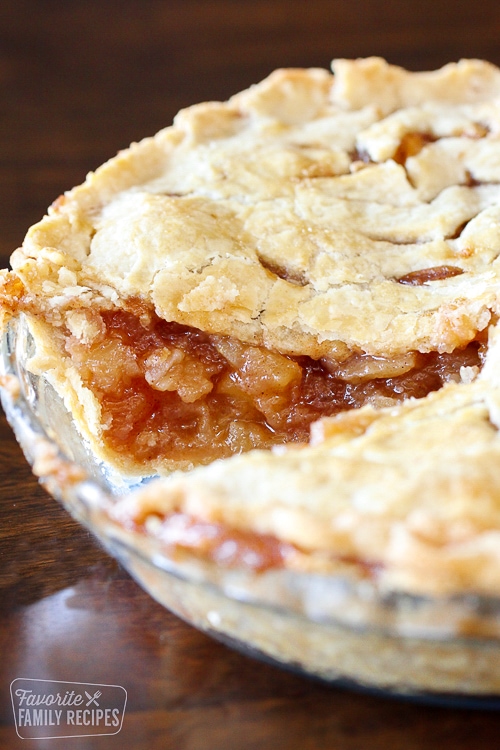
After the leftover turkey, gravy and cranberry sauce is tucked away in the refrigerator and all the dishes are done comes my favorite part of every Thanksgiving: snuggling up by the fireplace with a slice of this Homemade Apple Pie with a scoop of vanilla ice cream, and reminiscing with the family about past holidays. There’s something warm and familiar about the sweet apple filling and buttery crust with ice cream melting into every crevice. This pie recipe is so easy to make; it can become part of your favorite holiday traditions too.
How to Make a Homemade Apple Pie Crust
Any delicious pie begins and ends with the pie crust. Making that light, flaky, buttery crust is actually very simple. Click here for details on how to make the Perfect Pie Crust.

How to Make the Best Apple Pie Filling
Homemade apple pie filling is so easy to make, you’ll never go back to the canned stuff again. Here are a few tips to make rich, thick filling:
- Cook the apples ahead of time (see recipe below). Cooking the apples down a little bit ensures you have complete control over how the top of the crust looks. Since the apples cook down during baking, the crust could look a little lumpy. If they’re cooked down before baking, the top crust will stay nice and smooth.
- Soak your apples in apple juice. Buy any kind of inexpensive juice you like. Letting your sliced apples soak in apple juice enhances the natural apple flavor and prevents browning.
- Choose the right apples. Tart apples like Granny Smith or Honey Crisp work best.
How to Keep Apple Pie Filling from Becoming Too Runny
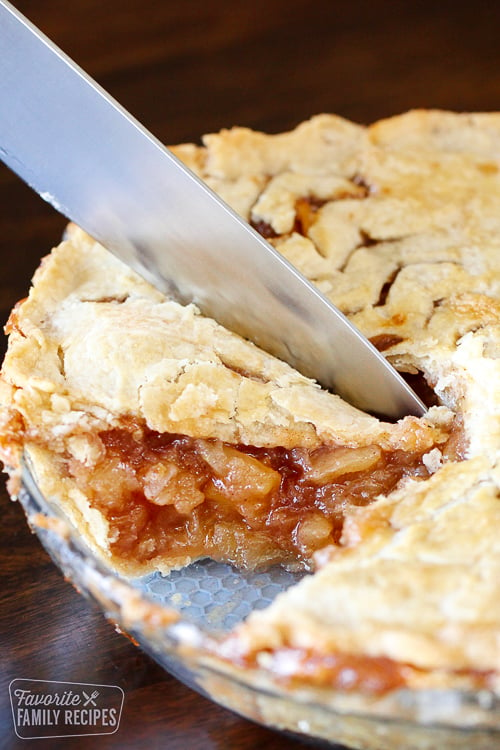
Apple pie filling should be thick and decadent and not too runny. You don’t want to ruin that gorgeous pie crust by making it soggy! Here are a couple tips to help keep it from becoming too runny:
- Try adding a thin layer of flour to the bottom of your crust before spooning in the pie filling.
- Make sure to bake the pie for the entire recommended period, maybe just a touch longer. Give that pie a chance to really bake!
- Cut vents in the top crust to allow moisture to escape during baking.
- Let the pie cool completely before slicing. This apple pie recipe is ideal for baking the day before. Then it will be perfectly set when it comes time to dig in.
What is the Best Way to Store Apple Pie?
You can store this Homemade Apple Pie at room temperature for up to two days. Along those same lines…
Should Apple Pie Be Refrigerated?
You can store this leftover apple pie in the fridge, as long as it’s covered loosely so no moisture gets trapped inside.
Can Apple Pie Be Frozen?
Yes! To freeze, wrap the pie tightly with freezer wrap and store up to four months. To reheat, let it thaw in the refrigerator, then bake in the oven for about thirty minutes, until warm.
Is Traditional Homemade Apple Pie Gluten Free?
While this recipe is not gluten free, we have a scrumptious Gluten Free Apple Pie that you must try! It is so good, you’ll never miss the gluten!
More Favorite Pie Recipes
Pie season is so much fun! Try a few (or all!) of these delicious pies. We just can’t pick a favorite!
- Dutch Apple Pie With Crumble Topping
- Traditional Pumpkin Pie
- Brown Butter Pecan Pie
- German Chocolate Pie
- Marie Calendar’s Chocolate Satin Pie Copycat
- Coconut Cream Pie
- Lemon Meringue Pie
How to Make Traditional Homemade Apple Pie
Traditional Homemade Apple Pie
Prep Time:
30 mins
Cook Time:
50 mins
Total Time:
1 hr 20 mins
Traditional Homemade Apple Pie is as warm and cozy as the season. With plump juicy apples, light flaky crust and a hint of cinnamon, this pie is everything you love about the holidays.
Course: Dessert
Cuisine: American
Keyword: Apple Pie, Apple Pie Recipe
Servings: 8 servings
INGREDIENTS (with Amazon Links)
- 6* medium tart apples (I use a combination of Granny Smith and Honey Crisp)
- 2 cups apple juice
- 1/2 cup white sugar
- 1/2 cup brown sugar
- 1/4 cup cornstarch
- 1 teaspoon cinnamon
- 1/2 teaspoon salt
- 1/4 teaspoon ground nutmeg
- 2 9 inch homemade pie crusts (recipe here) a store bought crust can also be used
- 1 egg white
INSTRUCTIONS
- Preheat oven to 375.
- Peel, core, and slice apples into thin, uniform slices, about 1/4 inch thick. As you are slicing the apples, toss them in a bowl with apple juice (enough to cover the apple slices) to prevent browning.
- Once the apples are all sliced, drain the apples in a colander placed on top of a bowl. Save the apple juice.
- In a large sauce pan, whisk the dry ingredients together - the sugars, cornstarch, cinnamon, salt, and nutmeg.
- Add 1 1/2 cups apple juice (use the apple juice used to cover the apple slices) to the dry ingredients. The mixture will be thick, but as the sugars melt, it will thin out.
- Bring to a boil, stirring with a whisk until it reaches the consistency of a thick glaze. Whisk in a little more apple juice if it becomes too thick.
- Stir drained apple slices into the glaze.
- Cover and reduce heat to medium-low. Cook until the apples just start to soften and become limp. Stir every couple of minutes. This should take about 5-7 minutes.
- Pour hot apple filling into an uncooked pie crust. Do not overfill the pie crust. The filling should be level with the top of the pie tin.
- Lightly moisten the outside rim of the pie crust by dipping your finger in water and "painting" around the edge of the crust. This will help to seal in the juices so it doesn't make a mess in your oven.**
- Place the top crust over the pie. Trim off any excess of the top crust that comes over the edge of the pie tin with a butter knife.
- Seal the top crust to the bottom crust by crimping the edge as shown.
- Slit vents in the top of the crust in a decorative pattern.
- In a small bowl, whisk egg white until it is foamy. Using a pastry brush, brush the top of the pie with the egg white.
- Bake for 50 minutes. After 20 minutes check the pie. If the crimped edge of the crust is becoming too brown, use strips of aluminum foil to cover the rim of the pie for the remaining cooking time.
RECIPE NOTES
*6 medium tart apples is equivalent to about 3 pounds of apples.
**To further prevent pie filling dripping onto the bottom of the oven, place a cookie sheet or a sheet of aluminum foil on the rack below the pie.
Comments
Post a Comment